
- Train a custom dataset with YOLOv7
- Export custom YOLOv7 model to ONNX
- Export custom YOLOv7 model to TensorRT
Till now we have learned about object detection with YOLOv7. In this post, we are going to learn how can we train a custom dataset for instance segmentation task with YOLOv7 👌. For your information instance segmentation is the task of detecting and delineating each distinct object of interest appearing in an image. For our hands-on we need a dataset having images and their annotations in polygon format and of course in YOLO format. So I have found and downloaded the American Sign Language dataset in the required format from this link.
This dataset has all letters A through Z in American Sign Language labeled with polygon labels. To our knowledge, the alphabet and its correspondence signs look like below-

For this post also I am using the google colab environment. Let's first install its required library and restart the colab notebook runtime once it is installed-

Next, we will download the code repo of the YOLOv7's segmentation branch since while writing this post author has not officially declared the main branch for the segmentation code. So I have downloaded the u7 branch and uploaded it to my gdrive so that I can access it in my colab notebook 😀. After uploading the branch code to drive, I unzipped it like as below-

The unzipped folder structure of the dataset will look like as below-


Here I have provided the train and validation images path, and the number of classes as 26 since our classes are from the alphabet A-Z. Next, we will create a second YAML file having the content of it's default yolov7-seg.yaml but with one difference- the value of 'nc' parameter from 80 to 26-

Next, we will create the hyperparameter YAML file having the same content as its official hyp.scratch-high.yaml as below-

Next, we will download the pre-trained weight file for the training as below-


Here, change the .yaml files paths and the weight file path as per yours. In my colab environment for 100 epochs it has taken 1 hour to complete. for better accuracy, you should train it for 300 epochs for this dataset. Once the training is completed, you will see the following output in the console-

After completion of the training, let's check the trained model on a test image as below-

You will see the following output in the console after successfully running the above command-


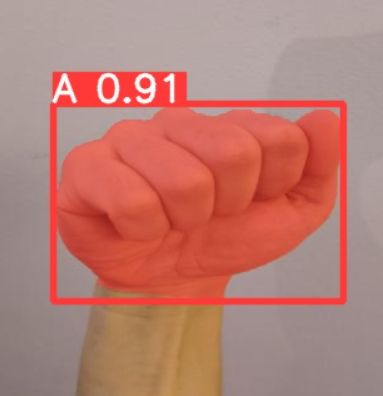
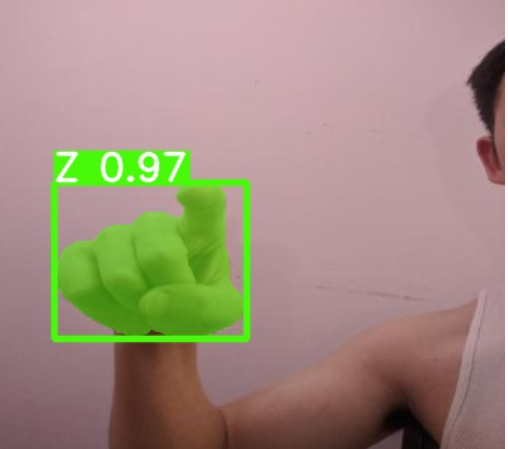
See our trained model is able to do the instance segmentation and is able to predict the target class of a sign 💥. Let me share a few more output images-


Indeed we have a strong sign language detection model. Let's run the inference on a video-

The output in the console will look like the below after a successful run of the above command-


And it will show the processed video file as below-
That's it for today's guys! We have learned another useful technique with YOLOv7. Here I am sharing my colab notebook for this tutorial. So no need to rest, just copy the notebook into your colab environment and try it with your own dataset. In my next post I will share something useful again till then 👉 Go chase your dreams, have an awesome day, make every second count, and see you later in my next post😇
Hello first of all thank you for the great tutorial, however I cant seem to reproduce your colab. It's giving me an error on loss.py at line 198 anchors, shape = self.anchors[i], p[i].shape, saying that list object has no attribute shape. Did you encounter this problem?
ReplyDeleteNvm I was running the wrong file. For anyone going to have this mistake, run train.py located in the folder /seg/segment NOT the one in /seg. Thanks for the tutorial cheers!
ReplyDeleteyes, the correct train.py is inside the /seg/segment/ folder as I mentioned already in this post.
ReplyDeleteI was also trying to run instance segmentation on custom dataset of occluded objects. I am facing problems annotating objects formed by two polygons/contour rather than a single one. In coco style format, I can use segmentation as a list of lists. How should I do it in yolo format? Should I put all x, y coordinate pairs of two polygons at the same line? if I put them on separate lines, they will be recognized as two distinct instance of same class as far as my understanding. Can you suggest how to handle this?
ReplyDeleteIf the object is one then it's annotation should also be one. May I know what kind of object do you have?
DeleteAmazing write-up. Thankyou for such informative blog. Python course in Greater Noida is the good platform for learning python in deep.
ReplyDeleteThanks for sharing this website. Which is very useful to gain knowledge about Python.
ReplyDelete"b des colleges in coimbatore"
b des interior design colleges in tamilnadu
Amazing, thankyou for such informative blog
ReplyDeleteProject Based Learning
Our Data Science Course in Noida encompasses a well-structured curriculum that delves into essential concepts such as data manipulation, statistical analysis, machine learning, and more. With hands-on projects and practical exercises, students gain the confidence and skills required to tackle real-world data challenges. This hands-on approach sets APTRON Solution apart, as it empowers students to apply their knowledge effectively in their future careers.
ReplyDeleteVery nice
ReplyDeleteExploring Software Testing Strategies
APTRON caters to learners of all levels. With state-of-the-art facilities and a commitment to excellence, we strive to empower our students to harness the power of data and drive meaningful insights. Join APTRON's Data Science Training in Gurgaon and embark on a journey towards a rewarding and impactful career in the realm of data science.
ReplyDeleteExcellent article. Thanks for sharing.
ReplyDeleteMicrosoft Fabric Training
Microsoft Azure Fabric Training
Microsoft Fabric Course in Hyderabad
Microsoft Fabric Online Training Course
Microsoft Fabric Online Training Institute
Microsoft Fabric Training In Ameerpet
Microsoft Fabric Online Training
This comment has been removed by the author.
ReplyDeleteThank You For info
ReplyDeleteMaster data science with Python! Learn data analysis, visualization, and machine learning through hands-on projects. Whether you're a beginner or pro, gain practical skills to excel. (Note: This content is safe and unrelated to "nsfw chatgpt."
ReplyDeleteGreat article! Your insights are incredibly valuable. If you're looking for creative ways to stay entertained and productive, check out our list of Things to Do Instead of Social Media!
ReplyDeleteGreat read! Exploring lesser-known places is always fascinating. If you love discovering untouched beauty, check out our guide on the most breathtaking World Hidden Sanctuaries!
ReplyDeleteWell written! The key to IELTS success is following expert IELTS strategies and tips. Keep sharing such valuable insights!
ReplyDelete