Another post starts with you beautiful people! I hope you have already learned the state-of-the-art object detection technique Darknet's YOLOv4 from my previous posts. If you are new to my blog then I recommend you to once go through this link to learn about end-to-end implementation of YOLOv4. In this post we are going to learn the successor of the official YOLOv4 : YOLOv7: Trainable bag-of-freebies sets new state-of-the-art for real-time object detectors 💥. Since the official implementation of YOLOv7 is still not done in the Darknet framework, in this post we are going to use the Pytorch framework to train a custom dataset and then make inferences using the same Pytorch framework. But don't worry if you are new to PyTorch 👲, we are not going to reinvent the wheel in fact as a practitioner our goal should be to learn how to use it.
For our learning, we will use a real-world dataset and the problem- detecting starfish in underwater images. This challenge was held on Kaggle. It is a perfect use case for our learning since there are many other tutorials that use public datasets. However, preparing a dataset is also an important job before applying the training. So first let's understand the given dataset format-
Goal: To predict the presence and position of crown-of-thorns starfish in sequences of underwater images taken at various times and locations around the Great Barrier Reef.
Dataset: train/ - Folder containing training set photos of the form video_{video_id}/{video_frame_number}.jpg. [train/test].csv - containes following metadata for the images: video_id, video_frame, sequence id, sequence_frame number, image_id, annotations in COCO format.
Dataset Preparation: Let's take a look at the dataset with our Python code:
Let's verify if all the images have the annotations or not. We will later remove the images from our training dataset which don't have the annotations otherwise it will affect our model accuracy-
So we have only 20.93% annotated images in the given dataset. Let's remove un-annotated images metadata from our dataframe-
Also, let's remove the unannotated images with the help of
joblib's parallel function for speedup. Here we need to copy the data to Kaggle's output directory since the input directory doesn't have the write access-
So, we have now a total of 4919 annotated images to train/validate. Our next step is to visualize the images and see what annotations look like in these images. For this purpose, we don't need to write the code from scratch instead we will use
bounding box utility github 👼. Don't forget to give a start to this GitHub repo 👍. Let's import the helpful bounding box creation functions from the repo as below-
Next, let's fetch the bounding box coordinates using the above function-
Let's check the newly created column in our dataframe-
Now we have bounding box coordinates as well in COCO format. Since the given dataset has images of fixed sizes" (1280. 720); it's better to set another two columns- width and height in our dataframe as below-
Next, following the best practice of training dataset preparation, we will apply cross-validation to the dataset as below-
As you can see the number of samples is not same in each fold, so for the training we should experiment with each fold but for this post, I will use the first fold-
Prepare YOLO format dataset: Since till now we have cleaned and finalized the training dataset; the next step is to prepare this dataset in YOLO required format. For this step, we will export the labels into a .txt file. This .txt file will contain one row per target class where each row is in the following format:
target_class_name [x_center, y_center, width, height] . Here the coordinates must be in normalized form and target class numbers start with zero. All these required conversions can be done using the below code-
Let's check our converted bounding box coordinates in one of our cross folded dataframe-
Now we can visualize the training dataset images with their annotations using the matplotlib library as below-
And the sample annotated images look like the below-
After seeing the above few samples, we can imagine how complex a problem is this to solve with computer vision as compared to publically available datasets. Here the target class is very small and images are blurred. Let's see how YOLOv7 is going to detect these starfish 👀. But for now, let's create the .txt files required by YOLO-
Here 'nc' means a number of classes to detect that is 1 in our case, 'names' is the target class name that I defined as cots but you can give any name to it.
YOLOv7 training:
Till now we have prepared the dataset to start the training. For the custom training, YOLOv7 has provided the different sizes of pre-trained weights-
Here I am going to use the largest one:
yolov7-e6e_training.pt. To use this pre-trained weight for our training, we also need to use its configuration file (yolov7-e6e.yaml) that we can get from this
official config files link and the hyperparameter file (hyp.scratch.custom.yaml) that we can get from this
custom hyperparameter file link. Now first we will create a new hyperparameter configuration file and then we will copy the content from hyp.scratch.custom.yaml file to this new file in Kaggle as below-
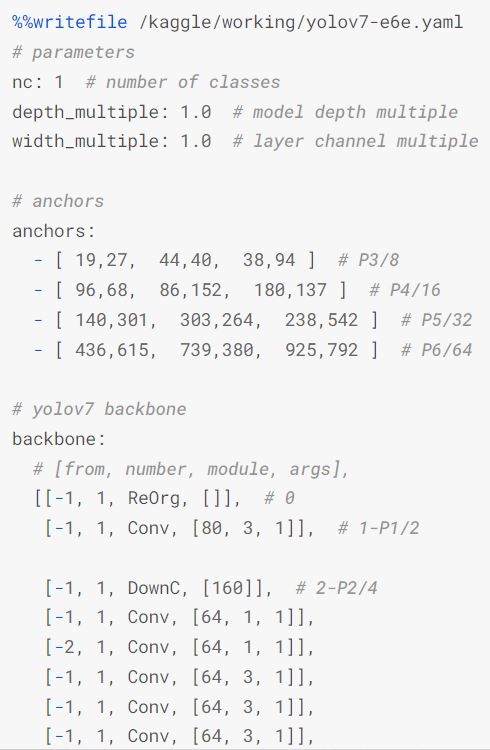
The same we will do to copy the content of the yolov7-e6e.yaml file to a new file in Kaggle-
Notice here in the above content, I have changed 'nc:80' to 'nc:1' since we have only one class to predict. Rest all parameters are the same. Next, we will clone the official
YOLOv7 repo in Kaggle's output directory, and then we will install the dependencies as below-
Once all dependencies are installed, we will download the pre-trained weights as below-
Now, we are ready to start the training with the below command-

Here, a number of workers I have defined as 8 which you can change accordingly to the system of yours, device as zero means single GPU training, the default number of epochs are 300 but due to limited training time in Kaggle I have used 26 as epoch size, batch size I have used as 3 to avoid out of memory issue but it should be 16 and rest other parameters are the pre-trained weight file path and the config file paths. Once the training is completed you can find the best-trained weight file (best.pt) under /yolov7/runs/train/ path as below-
YOLOV7 Inference: Since our training is completed, it's time to make inferences on the test images and prepare a submission file as required by the competition. For making inferences first step is to load our trained model. For this purpose, we can use
torch.hub.load() function as below-
In this function, the first parameter is the YOLOv7 repo path, the second parameter is 'custom' since we are using a custom trained model, the third parameter is the best weight file path, and the fourth parameter is given as 'local' since we are loading the model from our local file system and the rest other configurations we are setting to our loaded model are easily understandable.
After loading the model next step is to make the prediction. As required by this competition we need to predict the bounding box coordinates in COCO format and the confidence score of a given image in prediction and that can be achieved as below-
Here for bounding box conversion, I have used the helper code from
this awsome repo 🙏. Now we can make the required submission as below-
Here, we have iterated the iter_test variable since test images were not given as a whole instead organizer shared the API. After iterating each test image we made predictions using our custom-trained YOLOv7 model and formatted the predictions in the required format. Let's see one test image with the prediction-
It looks good 👌 but how can we know the goodness of our model? That's why I used the Kaggle dataset so that I can submit the prediction to this challenge and see my private score. Same I did and I got the following score with my trained model-
Next, I checked for any other submission but with
YOLOv5 and found the below score-
As we can see here, with default configurations of YOLOv7, my model has achieved a 0.602 private score as compared to 0.588 achieved by YOLOv5 which indicates that indeed the latest official release of YOLOv7 is faster and more accurate than other object detectors 💪. We can achieve a better result with hyperparameter tuning, different augmentation, etc.
For complete code reference please follow my training script
here and the inference script
here. So no need to rest guys 💣. Just forked my training notebook, do experiments, make submissions, and see how much can you score on the leaderboard 💨. This post and the shared notebook will be helpful in your journey to learn and use the state-of-the-art object detector. In my next post I will again bring you something amazing to learn till then 👉 Go chase your dreams, have an awesome day, make every second count, and see you later in my next post 😇


This comment has been removed by a blog administrator.
ReplyDelete