
Most of the businesses are adopting digital transformation to modernize customer communication and improve internal processes. By personalizing the user experience whether in a chatbot conversation, on a website or in email, you can make your user feel more valued and understood. Google DialogFlow and Amazon Lex are two pioneer vendors for building end to end personalized chatbot applications. In this post we are going to use Amazon Lex to build our chatbot and after the end of this post you will have your chatbot integrated with a web page and also your web page will be deployed on AWS cloud. This post is going to be long and very interesting so stay focus and keep reading the post till the end.
Step 1. Creating your account in AWS
To proceed with this post you must have an AWS account. If you don't have , just follow this link to create a free tier account there. While registration it may ask for your card details. No need to worry about any deduction. It's only for verification of your identity. Also we are going to use free tier services which is quite enough for our exercise so go ahead and make your account. As an extra security to avoid any charges after free tier expiration you must follow this link. After successful activation of your account you must login there by clicking on 'Sign In to the Console' button as showing here:

Once you login in your account, you need to update your region to 'US East (N. Virginia) us-east-1' as this region is required to deploy our chatbot using Amazon's CloudFormation. Your region should be look like as in below screen-
Step 2. Configuring Amazon Lex
Next, you need to open your Amazon Lex console. For this type 'Lex' or 'Amazon Lex' in the Find Services search box and select the Amazon Lex option as showing in below screen-

As soon you select the Amazon Lex option the page will be refreshed and you will see your Lex screen as below-

Click on the Get Started button and your lex console screen will be opened as below-
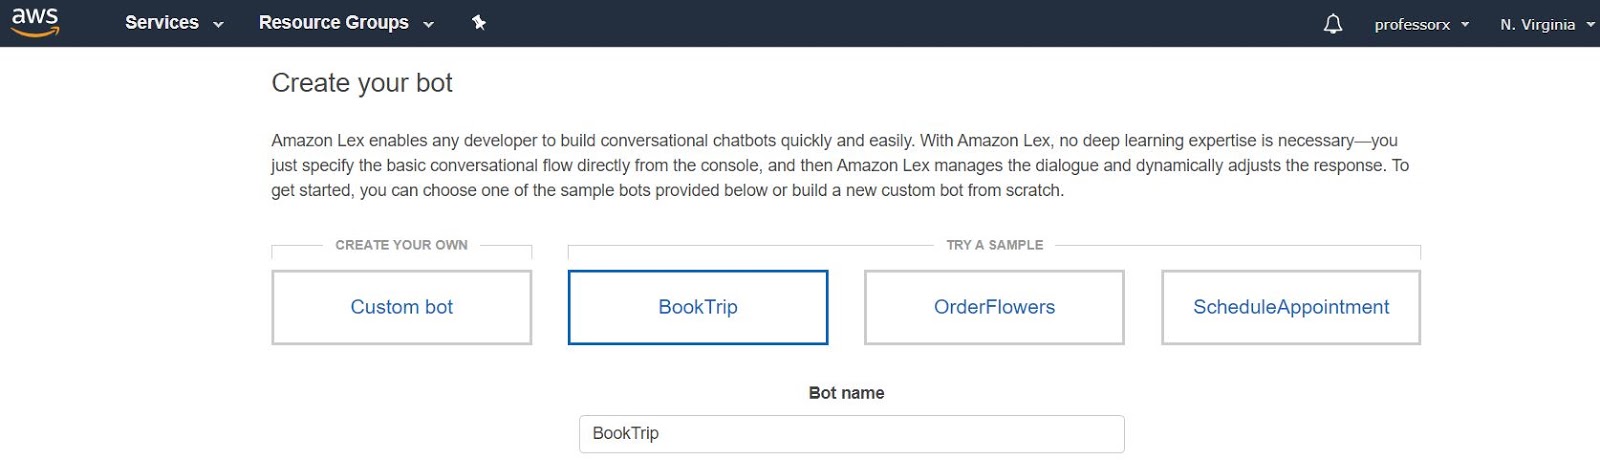
As you can see in above screen, Lex provides us some in built examples of personalized chatbots with Custom bot options. You can try any in built examples by selecting a Sample template. Before making our custom bot I recommend you to select OrderFlowers, check following options and click on create button -

Above selections are also applicable to Custom bot option. Based on your actual use case you can enable the Sentiment analysis option. If you want to enable both text and voice input to your bot the default IAM role is necessary. Once you click on the create button bot will open following look like console-

Since it is in built bot example, we have all set to test this bot functionality. you can test the bot by typing a question (I would like to order some flowers) mentioned in Sample utterances box in your test bot screen as below-

Go ahead follow the bot conversation flow and explore yourself with this example. Now I will move to the main goal of this bot- creating your custom bot and interact it with your MongoDB database to fetch some queries. This is an actual use case example where you have some product's or person's information stored in MongoDB database and to answer a question of a user you need to get from that db otherwise your bot is incomplete and could not able to fulfill the conversation.
Step 3. Setup A MongoDB Data
To move further you need some sample data in MongoDB. You can import any specific data for this exercise. If you are new to MongoDB don't worry I will tell you the steps. Any experienced person can skip this section and move to the step 4. To setup MongoDB, go to the Atlas Link and click on start free button. Please note MongoDB Atlas is a cloud based db setup so you don't need to do the db setup in your local machine. Complete the signup process and sign in your atlas account. We will use it's free tier (512 MB size) known as Shared Clusters to setup our db infrastructure as showing in below screen-

Click on Create a cluster button. In next screen select the aws as cloud provider & region, choose region as us-east-1 and click on create cluster button. After this step in next screen complete all options one by one as showing in below screen-

For example first create a database user there by clicking on 'Database Access' option and enter your username/password in below look like screen. Please must follow password guidelines link while creating your password otherwise you will face connection error later-

After creating your database user, next step is to add your ip to the Network Access option otherwise you will not be able to access this cloud cluster. Go to the Network Access and either add your ip to the list or select 'Allow Access From Anywhere' option as showing in below screen-


Once the sample data is loaded last step is to connect to the cluster. We have three options to interact with our db. We will choose MongoDB Compass tool. Select the third option-

After selecting MongoDB Compass, in next screen choose your OS and click on Download Compass button. It will start the downloading of MongoDB Compass in your system-


You can choose any of the sample data. To know how to connect and fetch db query in MongoDB please follow this link before moving to the next step. I will use airbnb data for this exercise.
Step 4: Configuring Custom bot
Following the step 2, we will now create a custom bot. Select the Custom bot template and fill up the details of your bot as I have filled for my bot in below like screen-


Next, we will add some questions a user can ask in the Sample utterances section. Go ahead add some questions there as I have added like below-


Go ahead fill the options and save the settings.Similarly we will add 1 more slot type as 'BedroomCount' and will provide it's value as 1,2 and 3-


Step 5: Creating AWS Lambda function in Python
Once we configure our bot, next step is to fetch the values from the database. In our case user will select the property type, number of bedrooms, cancellation policy and our bot will give him the total number of properties available with this criteria. This is just a sample use case for this exercise. You can make any query to db and fetch required details. Now to make lex and db interaction successful, we will create AWS lambda function in Python. This function requires some AWS specific format which you can read in this official link .
I generally create a python file in PyCharm and write the required code. Please note after creating the required Python file you need to create a folder in your local system and put that Python file there. Then you need to also import all required Python libraries in that folder and compress the content of that folder for uploading in AWS Lambda function console. For this example I have used pymongo library for db connection so I have installed this library in that folder. To do so once you have created an empty folder and pasted your Python file there, open anaconda prompt with that folder location run following command:
pip install --target <target_fodler_path> pymongo[tls,srv,gssapi]
Once above command run successfully, you can see some folders and files in your target folder. Now just select all files, compress them and a zip file will appear. This is the zip file you will upload in AWS Lambda console. Don't worry about writing the AWS lambda function from scratch. For your reference I am sharing my complete zip file which I have written by following best practices. You can download the complete zip file from this link .
Once you are ready with the zip file , in a new tab open Amazon Lambda console and click on Create function as showing in below screen-

In next screen fill up your function name, choose your Python version as 3.7 and click on Create function button-

Once your function is created, in next screen select option Upload a .zip file from the Code entry type dropdown as showing in below screen-


Step 6: Enabling AWS Lambda in Lex:
Once you have completed the step 5, go back to your Lex console and select the following two options with your lambda function name:
- Lambda initialization and validation
- Fulfillment


Click on Save Intent and then click on the Build button. Once build is successful, you can check your bot in Test bot window as below-

Quite interesting right! All hard work you have done till now, is paying you. Your bot is working as expected and you are now ready to integrate it with an actual web app.
Step 7: Integrate Lex bot with a web app and deploy in cloud:
You have created and tested your bot till step 6. Now you want to show it to your boss or client. You cannot show your test bot instead it should be shown either integrated with an app or a web page. Since I am not a mobile or app developer I will choose the web page integration. For this purpose AWS has it's own solution. With this in built solution not only you can integrate your bot with a working web page also you can deploy your bot in AWS cloud. So first publish your bot by clicking on Publish button in lex console, type an alias name and click on Publish button as showing in below screen-

Once your bot is published, you will see following screen-

If you are a mobile developer you can click on Download connection info button and if you want to integrate your bot with Facebook, Messenger, Slack etc click on Go to channels buttons otherwise close this window. For integrating with a web page, open AWS CloudFormation in a new tab and click on Create stack button-

Select the first option Template is ready. I am providing you my template which you can download from this link . Use the same template and click on Next-

In next screen give any name in Stack name field, enter your lex bot name in BotName field, enter bot's alias name in BotAlias field. Leave all fields as default and click on Next button. In next screen also click on Next button. Select both check boxes in next screen and click on Create stack button-


You have come so long! In this blog post not only you learned about Amazon Lex configuration but also some advanced tasks like creating AWS Lambda function, integration with MongoDB using Python and deploying your bot as a web page in AWS cloud. After completing this exercise not only you have completed an end to end real world project but also you have gained a rare skill sets. But don't stop here. Make your bot more mature by adding more slot types, db queries etc and help a customer to find out the best available Airbnb property for him/her. Till then Go chase your dreams, have an awesome day, make every second count and see you later in my next post.
I do agree with all the ideas you have presented in your post. They’re really convincing and will certainly work. Still, the posts are very short for newbies. ..Keep this great work..
ReplyDeleteChatbot Company in Dubai
Chatbot Companies in Dubai
Chatbot Development
Chatbot Companies
AI Chatbot Development
Chatbot Companies in UAE
Chatbot Company in Chennai
Chatbot Company in Mumbai
AI Chatbot Companies
Chatbot Development Companies
IntelliMindz is the best IT Training in Bangalore with placement, offering 200 and more software courses with 100% Placement Assistance.
DeleteBuilding Estimation and Coasting Course In Bangalore
First You got a great blog .I will be interested in more similar topics. i see you got really very useful topics, i will be always checking your blog thanks.360DigiTMG data science course malaysia
ReplyDeletewonderful bLog! its intriguing. thankful to you for sharing.
ReplyDeletedata science course delhi
"Nice Blog! such a informative things you are sharing ,I really liked your content. If you wanna know about ""Skillslash | Training with live industry experience that gets you hired""
ReplyDeletego to Data Science Course"
This post is very simple to read and appreciate without leaving any details out. Great work!
ReplyDeleteartificial intelligence course in aurangabad
It is very useful for me. Thanks...
ReplyDeleteAzure Data Factory Online Training
Azure Data Factory Online Training
business benefits I am impressed. I don't think Ive met anyone who knows as much about this subject as you do. You are truly well informed and very intelligent. You wrote something that people could understand and made the subject intriguing for everyone. Really, great blog you have got here.
ReplyDeletechatbot for website Really I enjoy your site with effective and useful information. It is included very nice post with a lot of our resources.thanks for share. i enjoy this post.
ReplyDeleteThanks for sharing this quality information with us. I really enjoyed reading. Will surely going to share this URL with my friends. organization professional
ReplyDeletePython Course in Gurgaon
ReplyDeletestolcesYmiss-ho Chris Swindle https://wakelet.com/wake/ex9jVOrwVfmW2gwyc16s7
ReplyDeletenoliryma
imdicroc-o-1994 Michael Adelaja download
ReplyDeleteclick here
https://colab.research.google.com/drive/1Mqw3ERYJc3Owe0-TJ-BmPeSKAfl8cn1f
download
taiclubafich