
Another post starts with you beautiful people! In the past few months I was working on a complex object detection and recognition problem. My client is from a leading winery industry and they had an existing system built on vgg19 and keras-retinanet. This system was built to help client in their sales forecasting. The problem with current system was it was inaccurate- it did not detect most of the wine bottles and brands, it did not give the result in real time. You can imagine how this bad model can affect the business!
To solve the existing issues I tried a lot of things- changing hyperparameters, increasing the datasets, different keras applications but it was not giving me satisfactory result. May be I was not doing it right but I had put a lot of time and efforts with it. Then while doing R&D, I read this fantastic blog and I came to know about a state of the art and real time object detection system- YOLO. You Only Look Once or YOLO is a custom deep learning framework written on C and you can read more about it in it's official site.
Instead of writing the code from scratch I found two github repository as third party implementation of YOLO version 3-
You can follow any of the above link and run this code to see how it works. In this post I will share how I tested this in my system. For testing this model on unseen pictures you need to follow below steps-
A. Prepare your virtual environment- The first step before starting your object detection and recognition journey is to install all required libraries. I recommend to create a virtual environment and install all libraries there instead of installing in base location. This saves your base location in case of any corruption while installing. To create and activate the virtual environment, open anaconda prompt with admin rights and run following two commands one by one-
conda create --name myNewEnv python=3.7.3activate myNewEnv
Here myNewEnv is the name of my virtual environment and 3.7.3 is my Python version. Replace it with your own name and version. Once you activate it, it's time to install required libraries. Before installing these libraries make sure you have Visual Studio 2017 with C++ extension is installed. If not then please install it and add C++ extension in it otherwise you will face unnecessary issues. Here I share list of mine which you can also use-
In above list you can see I have used variation of conda and pip. It is because while installing opencv and keras-retinanet in my windows machine I faced so much issues and I resolved those issues after so many efforts. So it is recommended to use above command as exact as I have mentioned. This is one time setup and most of the required image processing related libraries are mentioned in this list. Once all the installation is successful you can proceed with next step.pip install keras==2.2.4pip install tensorflow-gpu==1.14.0pip install scikit-learnconda install anaconda-clientconda install -c conda-forge/label/cf201901 opencvpip install keras-retinanetconda install shapelyconda install -c conda-forge imgaugconda install -c conda-forge google-cloud-visionconda install -c pjamesjoyce imutilsconda install -c anaconda flaskconda install -c conda-forge/label/cf201901 flask-restfulpip install tqdmpip install boto3pip install matplotlibpip install seabornpip install xlrdpip install pytesseractpip install apscheduler
B. Download pre-trained weights- Second step is to download the pre-trained weights from This Link. It's a 235 mb file with name yolov3.weights.
C. Define keras model- Our next step is to define a keras model to match with the downloaded weights. It means our keras model should have right number of layers and right types of the layers to match with Yolo weights. This is the actual complex part but in the github repositories I have shared earlier, you can find the functions written already for this task. So just copy those but don't forget to give a Star to the original authors in github. Here is screen shot of the code snippet-
# Create block of layers
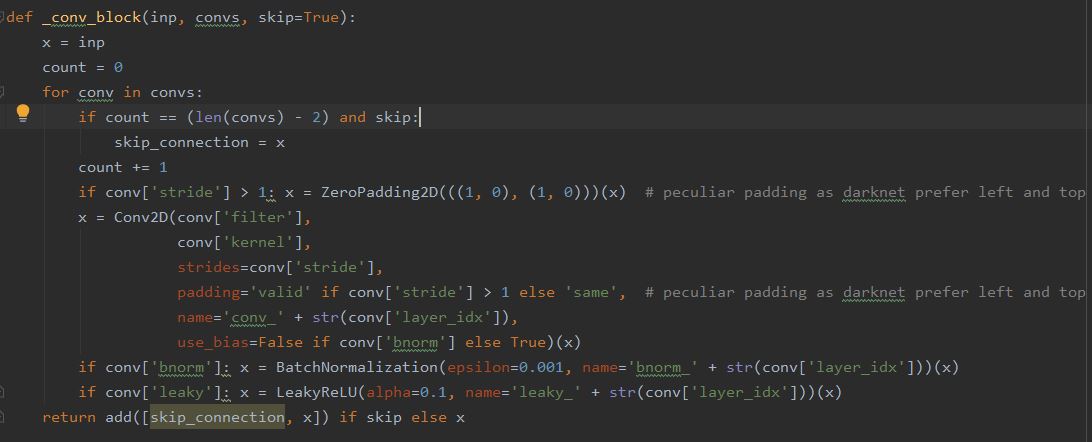
# Create the model


We can then easily use above functions and classes and then save result in keras format like below-

That's it. We have successfully completed the complex part. Now we can use this model like any other keras model we have used. Once you run the above code, you will see following like output in console-

Once the script is completed, in your current working directory 'model.h5' will be saved.
E. Test the model-

Once you run the above code, it will display output in NumPy array format-

F. Decode the output- Currently from the output we cannot say anything because it is NumPy format, in order to understand this we need to decode it. Here decoding means in terms of bounding boxes around our object. In the github repository of experiencor there is a function called decode netout(), which takes each NumPy array from our output one by one and decode the bounding box and prediction-

Once we apply the above function it will return the bounding boxes. But these bounding boxes can be stretched back into the shape of original image. To fix this issue the experiencor script provides the correct_yolo_boxes() function-

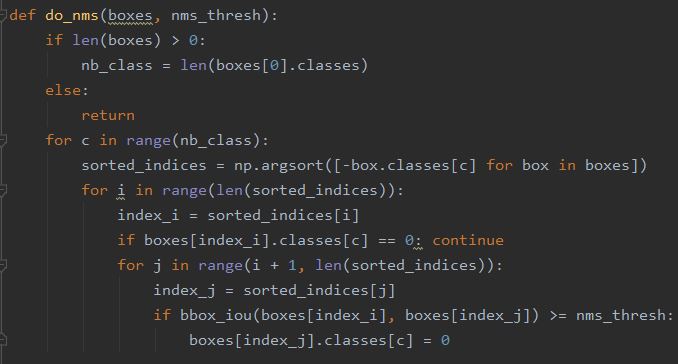
Now we will get fixed bounding boxes but one issue with this is those bounding boxes may overlap. To fix this issue the experiencor script provides a do_nms() function that takes the list of bounding boxes and a threshold parameter-
Next, we need to assure to get only those bounding boxes which have strong presence of an object. For this we need to enumerate over all boxes and checking the class predictions. In this way we can then add class label. Following code snippet does the same-

You can test this function on a list. In our case list contains the name of various objects like below-

Our next step is to draw the bounding boxes around our detected object. That can be done using below function-

Once you summarize all above functions or run the script provided in github repo, you will see bounding boxes and name of the object detected in your image like I am getting in my input image-

For my image, the model with pre-trained weights is showing amazing results. It is correctly able to detect bottle in my image. Check yourself on different images with different objects and see how this amazing model works in real time. I have used the same repositories to do R&D for my work and after a lot of practice and trials I was able to successfully use this model with my custom dataset. For now try the above steps I have shown you, read the code many times, change it's configurable values and analyze the effect. Till then Go chase your dreams, have an awesome day, make every second count and see you later in my next post.
can i run opencv and darknet at the same time?
ReplyDeleteCan you explain 'running' here? I have trained my dataset on YOLO and then for loading test image, creating bounding boxes I am using open cv wihout any problem.
DeleteThanks for sharing this blog.This article gives lot of information.
ReplyDeletePython Training in Hyderabad
Python Training
Is it really a best way to detect object in real time.?? BTW I will check it manually because it seems workable. Regards: mstweaks
ReplyDeletePython Classes in Pune
ReplyDeletePython Certification in Pune
Python Training in Pune
Python Course in Pune
Python Certification in Pune
Python Training Institute in Pune
Python Certification in Pune
Python Training Institute in Pune
Python Certification in Pune
Python Training Institute in Pune