
How to use Keras for Computer Vision- Part 3

Another post starts with you beautiful people!
I hope you have enjoyed my last post about image data augmentation and now you are comfortable with increasing the size of your small training dataset. Today's post is going to be interesting because we are going to learn how to handle color images and examples of using convolution with keras. Let's starts our learning-

In our first post of this series we have seen that typically an image can be stored in 3-dimensional format- one is for height, one is for width and one is for channels. Colored images have three channels- red,blue,green components. A deep learning network requires that image data should be provided as a 3-D arrays. There are 2 ways to represent the image data as a 3-D array. First way is known as 'channel last' and second way is known as 'channel first'.

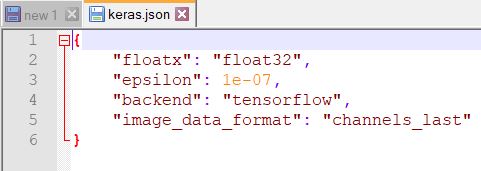
In 'channel last', last channel represents the color channels while in 'channel first', first channel represents the color channels. Please note some deep learning libraries prefer channel first ordering while some prefers last channel ordering. For example If we are using Tensorflow backend with keras then it prefers 'channels last' ordering. If you want to see the configuration file of keras with this setting you need to open keras.json file which resides in your home directory under .keras folder. In my system it is in following path: C:\Users\gupta\.keras and it's look like below-
You can modify above settings as per your need.

Let's see how can we use NumPy library to add a channel to a grayscale image?
Grayscale images are loaded as 2-D array so before modeling we need to add a channel dimension to that image. This means we are not adding any new data to the image, infact we are changing the array structure to have an extra axes with one dimension so that it can hold grayscale pixel values. NumPy has expand_dims() function for doing this task. Let's load a color image using Pillow library and see how can we use this function-
In above input cell you can see we have used 'axes' argument with expand_dims() function to define channel first and channel last techniques. Our loaded image has dimension of (375,500) which is a 2-D array. Once we added the channel first then it's dimension changed to a 3-D array (1,375,500) and when we added channel last then it became (375,500,1) dimension array.

Now we will move further and learn about Convolution in computer vision. A convolution is the simple application of a filter to an input that results in an activation. It is a common technique used in CV. Convolution neural networks do not learn a single filter; they learn multiple features in parallel for a given input. For color image filter must always have the same number of channels as the input, also known as depth. If an input image has 3 channels then a filter applied to that image must also have 3 channels. In this case, a 3 × 3 filter would be 3 × 3 × 3 or [3, 3, 3] for rows, columns, and depth.

Let's see a simple example of 1-D Convolution Layer: [0,0,0,1,1,0,0,0]. In this example we have eight elements.Now to use this input in keras we need to pass it as 3 dimension. We can represent this as [1,8,1] where first dimension represents the input sample, second dimension represents length of each sample and third dimension represents no of channels in each sample. So in keras we represent our 1-D convolution layer as below-

Next, we will define/create a model using keras' Sequential api as below-
In above input cell we have added our convolution 1-D layer with some required arguments. Here input_shape() argument represents input samples which is (8,1). kernel_size represents the shape of the filter which is 3 in our case and the filters argument represents the default filter of Conv1D layer which is 1 in our example. By default, the filters in a convolution layer are initialized with random weights. Let's apply this model to our input data using predict() function-
In above output you can see some negative values. This is because each filter in convolution layer has a bias input value which requires to manually specify a weight that will set to zero. We can achieve this by forcing the weights in our convolution layer to use a handcrafted filter. In our case it will be like [0,1,0]. So with this change our code will be like below-
Now you can see with our custom filter our model's prediction is correct!

In the same way you can use convolution 2-D layer. Here you need to use Conv2D() instead of Conv1D() layer. Also remember in this case input must be 4-dimensional where first dimension defines the samples, second dimension defines the rows, the third dimension defines the columns and the last dimension defines the channels.For in depth knowledge, I would recommend you to read following awesome blog-
https://machinelearningmastery.com/convolutional-layers-for-deep-learning-neural-networks/

That's it for today. We have learnt color channel ordering and basics of convolution in computer vision. Try above examples with 2-D layer and see what changes do you need. In my next post we will learn more about filter and kernel in convolution neural networks. Till then Go chase your dreams, have an awesome day, make every second count and see you later in my next post.


Comments

Post a Comment

Popular posts from this blog

How to install and compile YOLO v4 with GPU enable settings in Windows 10?

Another post starts with you beautiful people! Last year I had shared a post about  installing and compiling Darknet YOLOv3   in your Windows machine and also how to detect an object using  YOLOv3 with Keras . This year on April' 2020 the fourth generation of YOLO has arrived and since then I was curious to use this as soon as possible. Due to my project (built on YOLOv3 :)) work I could not find a chance to check this latest release. Today I got some relief and successfully able to install and compile YOLOv4 in my machine. In this post I am going to share a single shot way to do the same in your Windows 10 machine. If your machine does not have GPU then you can follow my  previous post  by just replacing YOLOv3 related files with YOLOv4 files. For GPU having Windows machine, follow my steps to avoid any issue while building the Darknet repository. My machine has following configurations: Windows 10 64 bit Intel Core i7 16 GB RAM NVIDIA GeForce GTX 1660 Ti Version 445.87

How to use opencv-python with Darknet's YOLOv4?

Another post starts with you beautiful people 😊 Thank you all for messaging me your doubts about Darknet's YOLOv4. I am very happy to see in a very short amount of time my lovely aspiring data scientists have learned a state of the art object detection and recognition technique. If you are new to my blog and to computer vision then please check my following blog posts one by one- Setup Darknet's YOLOv4 Train custom dataset with YOLOv4 Create production-ready API of YOLOv4 model Create a web app for your YOLOv4 model Since now we have learned to use YOLOv4 built on Darknet's framework. In this post, I am going to share with you how can you use your trained YOLOv4 model with another awesome computer vision and machine learning software library-  OpenCV  and of course with Python 🐍. Yes, the Python wrapper of OpenCV library has just released it's latest version with support of YOLOv4 which you can install in your system using below command- pip install opencv-python --up

How to convert your YOLOv4 weights to TensorFlow 2.2.0?

Another post starts with you beautiful people! Thank you all for your overwhelming response in my last two posts about the YOLOv4. It is quite clear that my beloved aspiring data scientists are very much curious to learn state of the art computer vision technique but they were not able to achieve that due to the lack of proper guidance. Now they have learnt exact steps to use a state of the art object detection and recognition technique from my last two posts. If you are new to my blog and want to use YOLOv4 in your project then please follow below two links- How to install and compile Darknet code with GPU? How to train your custom data with YOLOv4? In my  last post we have trained our custom dataset to identify eight types of Indian classical dance forms. After the model training we have got the YOLOv4 specific weights file as 'yolo-obj_final.weights'. This YOLOv4 specific weight file cannot be used directly to either with OpenCV or with TensorFlow currently becau